
The Single sign-on (SSO) allows your users to log in with a single ID and password to gain access to any of several related systems.
T&S allows you to use the SSO with your identity provider using the SAML protocol to simplify users' management and make it easier for them to connect to the app.
⚠️ It is preferable that this configuration is done by a member of your IT with experience in creating applications within your identity provider (IdP).
1st step: Set up your Identity Provider
1/ First, go to your Studio > Organization > Connectors > SSO/SAML.
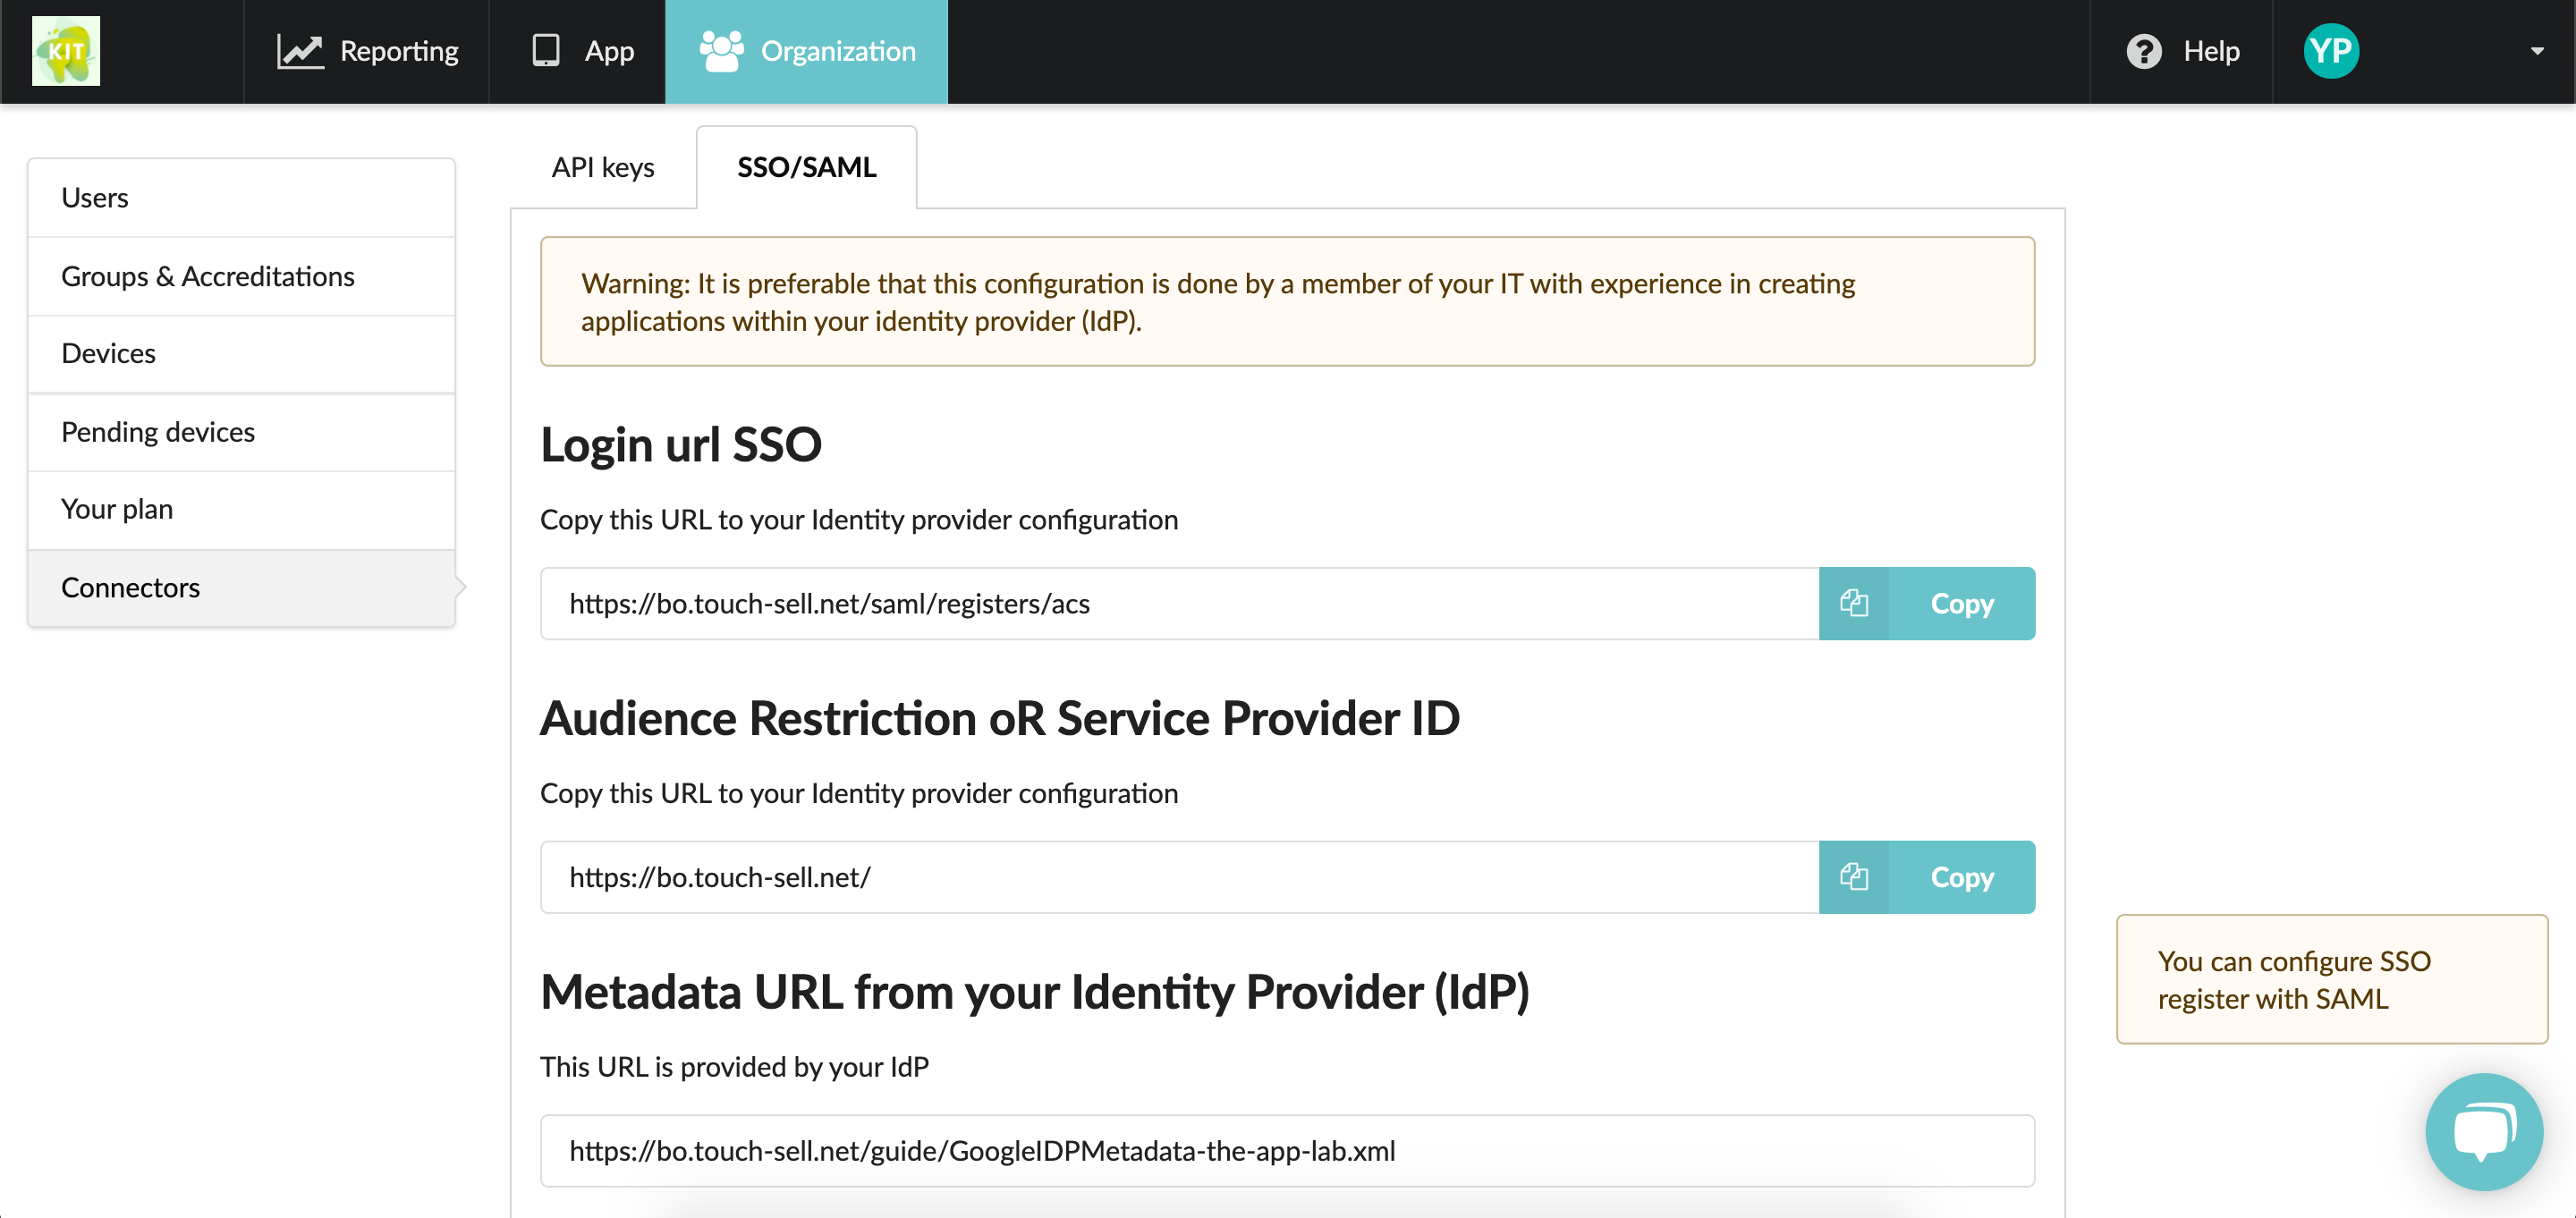
2/ The fields Login url SSO & Audience Restriction or Service Provider ID are specific to your Touch & Sell application. They must be copied/pasted in the configuration of your IdP.
3/ Once you've added the 2 URLs , your IdP will give you a Metadata URL. Copy/Paste it in the field Metadata URL from your Identity Provider (IdP) in your T&S Studio.
4/ In your IdP, you must configure the mapping of the following attributes so that your users are correctly identified in Touch & Sell :
- the attribute firstname must be associated with the user's first name
- the lastname attribute must be associated with the user's last name
- the email attribute must be associated with the user's email address
5/ When configuring your IdP, do not forget to allow your users to connect to the Touch & Sell application.
For AD FS configurations :
- Make sure to Enable the RelayState parameter.
- Here is a script to help you correctly set up your AD FS parameters:
$Endpoint = New-ADFSSamlEndpoint -Binding "POST" -Protocol "SAMLAssertionConsumer" -Uri "https://bo.touch-sell.net/saml/registers/acs" -IsDefault $True
$ClaimRules = @'
c:[Type == "http://schemas.xmlsoap.org/ws/2005/05/identity/claims/nameidentifier"]
=> issue(Type = "http://schemas.xmlsoap.org/ws/2005/05/identity/claims/nameidentifier", Value = c.Value, Properties["http://schemas.xmlsoap.org/ws/2005/05/identity/claimproperties/format"] = "urn:oasis:names:tc:SAML:1.1:nameid-format:emailAddress");
c:[Type == "http://schemas.microsoft.com/ws/2008/06/identity/claims/windowsaccountname", Issuer == "AD AUTHORITY"]
=> issue(store = "Active Directory", types = ("email", "lastname", "firstname"), query = ";mail,sn,givenName;{0}", param = c.Value);
'@
$ClaimRules | out-file rules.txt
Add-AdfsRelyingPartyTrust -Name "Touch and Sell" -Identifier "https://bo.touch-sell.net/XXX" -SignatureAlgorithm http://www.w3.org/2001/04/xmldsig-more#rsa-sha256 -SamlEndpoint $Endpoint -IssuanceTransformRulesFile rules.txt
2nd step: Customize configuration options.

- Create users automatically on login
By switching this option ON, you no longer need to list your users in the Studio, prior to invite them to connect to the app. When connecting via SSO, they will be automatically added to your T&S users list and a license will be assigned to them.
These newly created users will be added to the group "Principal".
- Connexion mode
You now have two options to connect to the app:
Via SSO: This is the method explained in this article.
Via Email: Users must be registered in the Studio beforehand. Then, when connecting to the app, they are invited to connect with their email address. An email will be sent so they can confirm their identity before going back to the app and starting to sync the content.
⚠️ By default, the Email method is activated. Once you've set up your Identity Provider, make sure to activate connexion via SSO (or at least "Email + SSO" to let your users choose their favorite method).
- Name of SSO
To make sure the connexion method will be clear enough for your user, you can customize the connexion button.
I.e. "via Google" or "with Salesforce" to have a button called "Login via Google" or "Login with Salesforce"
⚠️ Make sure to click "Save" once you're done.
3rd step: Connect to the app (for your users)
Once they have downloaded the app on their device, users will be invited to connect to the app, using the SSO method, provided that you've correctly set ip up as described above.
By clicking the button to connect via SSO, they'll be redirected to the interface for connecting your Identity Provider (i.e: Google).
- If the option to create users in ON: No matter if the user is already listed in your T&S Studio, the profile will be automatically created after the connection and the device will be linked to it.
- If the option to create users is OFF: You first need to create user profile in the T&S Studio and give them access to the app to allocate a license to the newly created profiles.
Note:
For the moment, the modification/deletion of users in your IdP is not reflected in the Touch&Sell application. If you make a change to a user after they have logged into the application, you will need to change their user profile from T&S Studio.
Commentaires
0 commentaire
Vous devez vous connecter pour laisser un commentaire.